
Warlord Deckbuilding: Thinking About Card Draw
/
To Draw or Not to Draw?
When you sit down to play a game of Warlord, the only cards you are certain to have are your warlord and your starting army. Other than that, you’ll be rolling a 20-sided die and seeing five random cards from your 44 card deck every turn. That’s a lot of random chance to deal with.
Warlord is all about minimizing that randomness: high strike rolls minimize your chance of missing, making a ton of strike rolls increases your chance of hitting, and running card draw increases your chances of seeing the cards you want to see. In this article, we’ll discuss the card draw mechanic in detail—when to use it and what may be the best cards to help you use it.
Card draw is one of the most potent tools in a player’s arsenal: the more cards you see on a given turn, the more options you’ll have and the more likely you’ll find the options you need. So why doesn’t everyone cram their decks full of all the Meet at the Inns and Back Alley Taverns they can find? There are two general reasons why too much card draw can be problematic:
1) Draw takes actions.
2) Draw can be countered.
Draw takes actions. You need to spend your actions to draw cards. Each action you spend adding cards to your hand is an action your opponent can spend changing the board state in their favor. Giving actions to your opponent is problematic for archetypes like rush decks, where you want to strike as quickly as possible, and the longer you give them to prepare, the harder it will be to cut through their defenses. When rush decks play card draw, it will typically be Draw + Effect cards like Carg’rag or From Dust to Dust. For slower decks, who will have fewer options on turn 1, the action cost of draw is not as big of a deal.
Draw can be countered. Cards like Staff of Secrets, Rr’gent and Twist of Fate can turn cards that draw cards into dead cards. No other type of card can be made so completely irrelevant so simply. Furthermore, the more people playing draw, the more likely other people will play draw hate (cards that prevent or interrupt draw), and then the more draw you’re running, the worse it will be for you.
Card Draw Card Analysis
Assuming you’re not playing a combo deck that runs every piece of card draw it can (hello, Dragon’s Hoard!) in an attempt to find your pieces before your opponent can kill you/access their counter draw, you’re going to want to think carefully about how you’re drawing cards. The rest of this article is analysis of some of the most common ways players draw cards in Warlord.
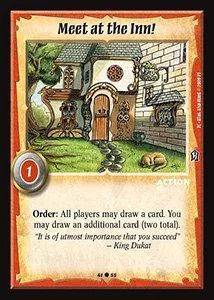
Meet at the Inn – The classic draw card. You pay a card to get two, your opponent gets one for free. Both players end the action with 6 effective cards for the turn, but you have removed an additional card from your deck. This can also be played by any character, allowing you to dodge counters that punish the character drawing, like Baraz or Exhaustion.
When to Run: If the cards in your deck are, on average, better than the cards in your opponent’s deck. You’re giving your opponent something here too, so you must make sure what you’re getting is better. For combo decks, this is generally true: they’re betting their whole game that the opponent’s deck can’t handle a particular set of cards, so the quicker they find them, the better. The same is true for Uber, with the idea that once your Warlord hits a certain power level, your opponent won’t be able to kill them.
When not to Play:
You can literally always play Meet at the Inn. But when should you? There are two chief drawbacks to a Meet: 1) it gives your opponent something else to do and 2) it sits in your hand, taking the place of other cards. Deciding when to play Meet at the Inn is a matter of weighing these two drawbacks. You don’t want your opponent being able to perfectly plan their turn with the 6th card you’ve given them, so it can be good to delay playing Meet as long as possible. You also need to be able to do what you WANT to do: Meet helps you do that when you play it, and hinders you when it sits in your hand. Always consider if you need those two more cards immediately, and how much that one extra card of your opponents’ might hurt you.
Back Alley Tavern – Draw through counter draw! Back Alley Tavern is either a very expensive cantrip (a card that replaces itself when you play it) or a free card and some deck thinning. In your starting army, only your Warlord will be able to play it (barring Lekar Osud plus Yanthorine!), so be careful of Ill-Gotten Gains or Exhaustion.
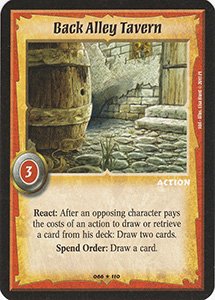
When to Run: there are two reasons to run Back Alley Tavern. The first is that you’re running combo and want to play every cantrip you can. Back Alley Tavern is a Dragon’s Hoard with upside. The second reason is that you think there’s going to be a lot of draw/retrieval in the meta and you want to take advantage. Elves and Nothrog are always drawing, Xod and Adarymy are always drawing, Necromancers must retrieve to play Wheel of Death. Wizards are always retrieving or drawing with Phantasm and From Dust to Dust. They’re getting paid, why shouldn’t you?
When not to Play: if you’re playing against a combo deck and you aren’t running any other draw, playing a Back Alley Tavern may allow them to play their Back Alley Tavern, and their two cards are probably going to be more important than yours. Also, if you can’t trigger the react, it requires spending a high-level character, so be sure you won’t clog up your back ranks.
Loyalty’s Reward – Sir Robert’s favorite action. Two cards for a spent high-level fighter: perfect for fighter Warlords who want to sit in rank 3. It notably also transforms Bokos from a mediocre level 4 into a card draw machine.
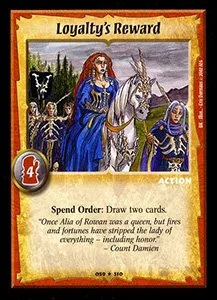
When to Run: you’ve got a fighter Warlord who doesn’t mind hanging back: Sir Robert, Kothkah, Jorn of the Summit, Sir Aleron d’Ilchant. Or you’ve got a bunch of level 4 fighters who can cover for your non-fighter Warlord. If you don’t have a fighter Warlord, you’ll need either a lot of other card draw or a lot of high-level fighter characters to limit the risk that Loyalty’s Reward turns into a dead card.
When not to Play: Loyalty’s Reward can clog up your back ranks like no other. If you’ve got just a Warlord in rank 3 and a level 4 fighter in rank 4, and you use that level 4 fighter to play Loyalty’s Reward, what are you going to do if you draw 2 more level 4 characters? You’ll have to spend your Warlord up to rank 2, severely weakening your defenses. Make sure before you play Loyalty’s Reward you have a plan to play the other cards in your hand.
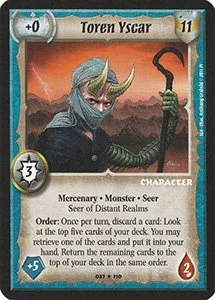
Extensions – This is Toren Yscar on a stick, with the bonus of letting you send a bad crop of cards to the bottom of the deck. It’s an excellent cantrip card but comes with the high cost of forcing you to spend a level 3 wizard.
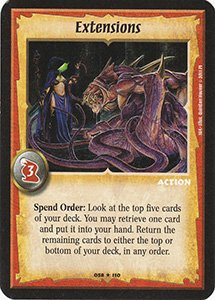
When to Run: if you can start Cal Blackthorne or are Angu Mournwater, this card is worth a look. Otherwise, you must be happy either spending your Warlord for it, or be running several supporting Wizards. Elves and Deverenians frequently run enough supporting Wizards like Caran Tremayne or Cyrus Netheryn to pull it off. Just like Loyalty’s Reward, running off-your-Warlord’s-class draw can be a big risk.
When not to Play: Extensions is strong in its niche, but rarely strong enough to justify a spent Warlord. If you’re playing combo, spending your Warlord for Extensions in a pinch is manageable, since combo’ing off early turn 2 is usually fast enough. But if you see it after turn 1 and don’t have any back up wizards, it will likely be a dead card, or you’ll be too behind on tempo anyways. If you don’t have a character in your starting army who can play it, or a whole bunch of Wizards looking for something to do, look elsewhere for card draw.
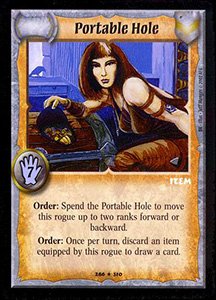
Portable Hole – Portable Hole is arguably the best Rogue card ever printed, a non-Steed movement item that turns any item into a cantrip. Rogues like to move, and Rogues like a very particular set of items (Giant Bats, Helms of Fortune, Black Steel Daggers). Portable Hole lets you move and lets you play multiples of your power items so you can cycle the extras. If you’re willing to commit to the draw engine, running Nodwick and Cloak of Many Things and Trade Routes, it can draw you a lot of cards.
When to Run: You need a very good reason not to play Portable Hole if you’re a rogue. It’s a free movement cantrip at the very least. If you’re darting into your opponent’s ranks as quickly as possible, it gets you to the front ran for free, and you’ll be playing other characters who can equip it, like Wanderetch, to hold your ranks while you’re in the enemy formation and unable to. Play Portable Hole.
When not to Play it: if you’ve got a rogue, play Portable Hole. But if you’re up in the front without another way to get back (like Giant Bat), be careful about discarding it, because that’s free movement for the rest of the game you’re sacrificing.
Forewarning – Clerics are a bit short on the draw compared to other classes, but Forewarning is a solid cantrip with upside if you’re a seer, and almost certainly not worth it if you aren’t. It’s similar to another Spend-Order-except-for-Seers, Wheel of Fate, except that you usually want to play Forewarning as quickly as possible, and Wheel of Fate cantrips every card in your hand, so you want to wait until you’ve played everything you want play from your hand.
When to Run: You’re a Seer running a combo deck. You need all the draw you can get, and Forewarning is better than Dragon’s Hoard.
When not to Run: If you aren’t a seer, or if you aren’t playing combo. You’re either playing blitz or control. If you’re playing blitz, an action for a cantrip is a waste of an action most of the time and takes up space in your deck for offense. If you’re playing control, Forewarning takes up space for answers like Litany, Reflect and Exhaustion, that you could need immediately. It also takes up space for niche solution cards, like Peace or Figurine of Protection. The same holds for Wheel of Fate, although Wheel’s ability to draw more cards might make it more appealing.
From Dust to Dust – Probably the most powerful level 1 wizard spell in the game. Even without the ability to conjure up a character from nothing, it’s a spell with a high DC that goes THREE ranks. Your 2nd rankers can hit your opponent’s 2nd rankers. That’s amazing. With the character gain? Insanity. Most wizard spells are aiming to kill an opposing character. You’re trading a non-character card for a character card: that’s good. From Dust to Dust let’s you trade a non-character card for a character card AND get another character of your own. That’s an incredibly high value play.
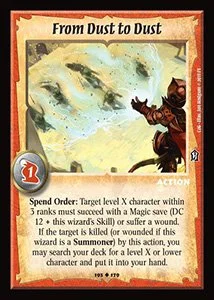
When to Run: You’ve got wizards with 3 or more skill, and a level 1 character in your deck you wouldn’t mind fetching. In the ideal world, you’re a Nothrog using Yeg-Igryll’s Altar to grab Carg’rag, or an Elf using Skyyrek to snag Kapix. But any free character while killing an opponent’s character is great. If there’s a level one character your deck is centered around, like Ardanaalis, it’s worth considering level 2 wizards to start just so you can run 3 copies of From Dust to Dust.
When not to Play: There are two primary hiccups to pulling off From Dust to Dust. 1) Your opponent has clerics and Reflects you, and now you’re out a key wizard you wanted to protect. 2) Your opponent plays draw hate like Staff of Secrets or Baraz. From Dust to Dust is a draw spell and will be cancelled by Staff and can get its caster sniped by Baraz. If you’re playing vs. a cleric, hold on to that Dust and try to force out a potential Reflect first. If you’re playing vs. a wizard or suspect a Baraz might be coming, play that Dust ASAP. Finally, Dust is the greatest Jackals of Mourn killer in the game. If you suspect a Jackals, consider delaying your Dust.
Drawing with Characters
Drawing cards with characters is almost exclusively better than drawing cards with actions—characters stay on the board and provide additional strikes and additional hit points for your opponent to chew through. In some cases, they’ll also offer repeatable draw. If your opponent is running counter draw, you’ll still have a body out on the field. But the 24 character slots in a typical Warlord deck are hotly contested: it’s characters that equip items and perform actions and it’s characters that win you games: how many of those slots are you willing to give to characters whose main benefit is drawing you more cards? As a thought experiment, I’ve divided the most commonly used card draw characters into 4 tiers, based on how and when you should try to slot them in.
Tier 1: Make Space!
Toren Yscar, Carg’rag, The Lost Bride, Sethusk
These are characters you need a strong reason not include when you’re building a deck. Toren is restricted to 1 copy for a reason. Every deck has cards that are better in certain situations than others. Toren is the easiest way to trade out your cards that aren’t perfect for the situation at hand for your cards that are. Carg’rag and The Lost Bride are our successors to Daedelia—a body for a card. Carg’rag only works on turn 1, but turn 1 is the most important turn in most games, and she’ll also provide a strike. The Lost Bride is similar, but won’t strike for your T1, so could potentially be cut from certain hyper aggressive decks. Sethusk requires an additional action to get that card, but he’s also probably the favorite dish of Nothrog dining tables, so he slots into many of even the most aggressive Throg decks.
Tier 2: Lock Ins for the Right Deck
Llyr Militia, The Devoted, Elemere, Hassimal, Redu Carr, Ramah the Cruel
These guys don’t belong in every deck, but are very strong options when they do. Their draw has a higher cost, but one that’s frequently worth it to pay. Llyr Militia and The Devoted are two of the most stalwart level 1s in the game, providing protection vs multiwounding, level draining, high strikes, and instant-kill effects. Hassimal requires you to spend two characters to draw a card—if you’re trying to draw as much as possible to find your combo, this is amazing! If you aren’t, don’t run him. Elemere, Redu Carr and Ramah the Cruel trade character death for cards—worth it again in combo, and worth it even more if you’re running Necromancers like Feyd Rowan or Azhraan the Foul.
Tier 3: Build Around Them or Ignore
Nelchat the Horror, Revan, Theodore d’Ilchant, Destruction, Flamefang, Knowledge, Limestone Gargoyle, Nepheline Gargoyle, Shame, Vision, Borgen Ferriss, Garth Drac, Harty Tate, Kieran, Alaya, Grihilga, Ivaas (Toren’s less talented little brother), Richard Key, Ga’dok
I won’t break these characters down one-by-one, but there are a couple of reasons a character might be on this list. Maybe they only draw a certain type of card, like Borgen Ferriss or Revan. Cards like this are amazing in decks that want to move their Warlords up as quickly as possible, but useless if you don’t run steed. Others are universally strong, but difficult to get into play, like Nepheline Gargoyle or Garth Drac. You’ll play these cards if your deck allows you to get them out and you want the extra draw, but many decks just won’t have a chance to play them. Finally there are cards whose draw is more costly, or very niche, and requires a huge commitment to draw or a very specific approach to it, like Richard Key or Ga’dok.
Tier 4 Other Reasons: They Draw Too??
Darkness, Eresh q’Shedim, Kel’suk, Rica O’Shea, Shan-Kassyn
If you’re looking for cards with which to draw as much as possible, these typically aren’t the guys you’ll choose (excepting that one infinite Eresh-Duanna deck). These are cards you play to kill your opponent (or help you play other cards that will kill your opponent, for Shan-Kassyn), and they also happen to draw you cards. Don’t play them for the draw—the draw is gravy.
Building Your Deck
Hopefully this article has given you a solid base to think about card draw in Warlord. How badly do you need those extra cards? What are you willing to sacrifice to get them? What tools best suit your deck, and how and when do you want to play them? And if all this talk has just gotten you excited to shut down your opponent’s attempts to draw, keep your eyes peeled for our next article!